
Introduction to a Deeper Look – Part 1: The path of light up to your multiphoton microscope
Introduction
Some time ago, we proposed the idea of a blog series covering misconceptions, unexpected aspects, and brain teasers in multiphoton imaging on Twitter. One of the first responses was the request to provide an overview and refresher on what all the bits on the table actually do, which seems like the perfect starting point for our article series. In this two-part introductory article, we will walk through a typical multiphoton system, from laser to objective, providing some background and the not always obvious aspects to consider for each component.
As the series develops, we will add links to articles covering more specific aspects to this introduction. While the series as a whole is aimed at more advanced users, in this first article we aim to provide an understanding to researchers new to the field as well. In light of this, the present introduction may seem a bit basic for advanced users, but we hope it will prove useful as a starting point for anyone interested in the practical aspects of multiphoton imaging.
In the following sections we will take a brief tour through a typical multiphoton microscope. We will put the primary emphasis on the intermediate parts of the optical path (prior to the microscope), as that is the section we find is often skipped in introductions.
Something needs to create the excitation light: the laser
Until about 2010 there was little choice when it came to lasers for two-photon imaging – it was always going to be some flavour of titanium-sapphire laser. These lasers produce pulses, commonly with pulse-widths between 70 and 140 fs (i.e. “ultrafast” or “ultrashort” pulses), at a repetition frequency of 80 MHz, and are generally tunable in the range of 690 to 1050 nm. As a result, they work well for most two-photon imaging experiments. But if a user wanted to use fluorophores that are excited at longer wavelengths (e.g. some cyanine dyes), they needed complicated and expensive extensions (e.g. optical parametric oscillators, OPOs). And if a researcher only needed a single wavelength for their experiments, and had no use for tunability, they still needed to pay for that tunability
In a first major change to the field, ultrafast laser sources that are tunable over an extended range from 690 – 1300 nm were introduced in 2011. With pulse widths, power levels, and repetition rates matched to those of Ti:Sa lasers, these laser sources quickly found wide-spread use. Though often sold as part of the “Ti:Sa range”, these light sources are very different beasts, best referred to as “one-box OPOs”. The OPO in these devices is pumped by a micron wavelength fibre laser and as a result they often use that pump laser as a second output at around 1040nm.
For the many researchers only ever needing to excite a single fluorophore (most commonly eGFP or GCaMP), recent advances in fibre lasers have seen a near flood of two-photon suitable fixed wavelength lasers being introduced into the market. Initially, this was limited to the 1020 – 1064 nm (“micron wavelength”) range, but fibre lasers in the 920 nm wavelength band required for eGFP imaging has also been available since 2018. These fixed-wavelength lasers all have pulse-widths and repetition rates similar to Ti:Sa lasers, but power levels can vary (1 micron wavelength lasers tend to be more powerful, 920 nm lasers tend to pack a bit less of a punch). In addition to a lower purchase price, these lasers tend to have much lower service requirements, are quieter and generate less heat in the room than the larger, tunable options.
How pulse-width, repetition rates and power levels interact, and their impact on multiphoton excitation will be addressed in future articles.
Guiding the light to where it needs to go: mirrors
Looking at a two-photon imaging system, the mirrors on the table are likely to be seen as the least interesting or exciting component. But it is worth keeping in mind that the laser beam is reflected by several mirrors (easily over a dozen in more complicated setups) before it reaches the sample, leaving a lot of chances for them to interfere with good imaging. If mirrors were perfect, they wouldn’t impact the result; however, in reality mirrors are far from perfect. One could say that good mirrors won’t make an experiment better, but they will make it less bad.
The case for using more mirrors is easy: for easy and reliable alignment two mirrors are required in front of each element on the table that needs a beam to be centred and parallel (see: alignment article for a detailed explanation). At the same time, the commonly used protected silver mirrors lose 2 - 3% of light in the multiphoton wavelength range per reflection. These losses are multiplicative, so the total loss is: 100 * (1 – (1 – 0.02)number of mirrors)%, meaning a system with 10 mirrors in the path between the laser and the sample will lose 20 to 25% of light just on the mirrors – if they are performing to specification and not glazed over or dirty. Consequently, ensuring the best quality mirrors are used and that they are kept clean is vital (Tips for cleaning the optics of your microscope). It is also worth ensuring that only the number of mirrors that are needed for safe, stable and reliable performance are used.
It is tempting to use mirrors with dielectric rather than metallic coatings, as these can achieve a reflectance of over 99.5%. The downside here is that simple dielectric coatings have a narrow wavelength band in which they are this reflective (usually <100 nm wide), dropping to very poor performance outside of that band. Wide-band dielectric mirrors are either not suited for the ultrafast pulses used for multiphoton imaging (they can degrade the pulse shape and massively broaden the pulse, see this blog post by Labrigger), or if they are designed for use with ultrafast laser pulses, they are much more expensive (roughly 10-fold the price).
In general, the ideal coatings for flexible multiphoton imaging are protected silver coatings. But for some special use cases, dielectric mirrors make sense (e.g. when fixed wavelength lasers are used and a narrow reflection bandwidth is not a concern).
Tweaking and adjusting the laser output: beam conditioning
Now that the laser is pointing in the right direction, it is time to think about how the laser beam needs to be adjusted and optimized for use in microscopy. The key points that need to be adjusted are:
- Beam diameter (to ensure good filling of the objective back aperture)
- Laser power (to achieve best possible imaging without causing damage)
- Pulse duration (to ensure the most efficient multiphoton excitation)

The Scientifica Beam Conditioning Unit +
Beam diameter
Beam diameter adjustment is typically achieved with a telescope consisting of two lenses. Passing through this beam expander, the input beam diameter is increased (flipping input and output will lead to a decreased size). Most beam expanders will require the collimation of the expanded laser beam to be tweaked. Ensuring the collimation is optimal is important to ensure reliable and predictable performance.
Laser power
Laser power is commonly adjusted via one of three methods:
- Varying neutral density filters
- Laser light polarization
- Diffractive elements
While in the past, attenuating the beam using neutral density filters was common, it has now fallen out of practice. Neutral density filters tend to be slow, inflexible and can introduce a heat-dependent lensing effect.
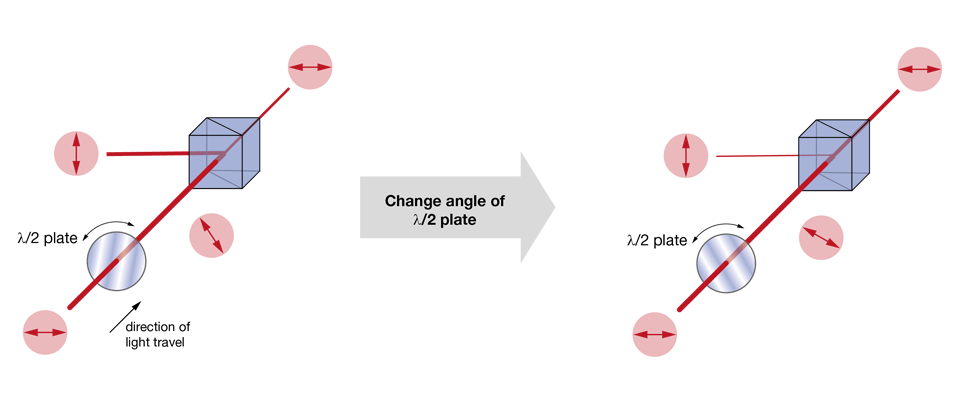
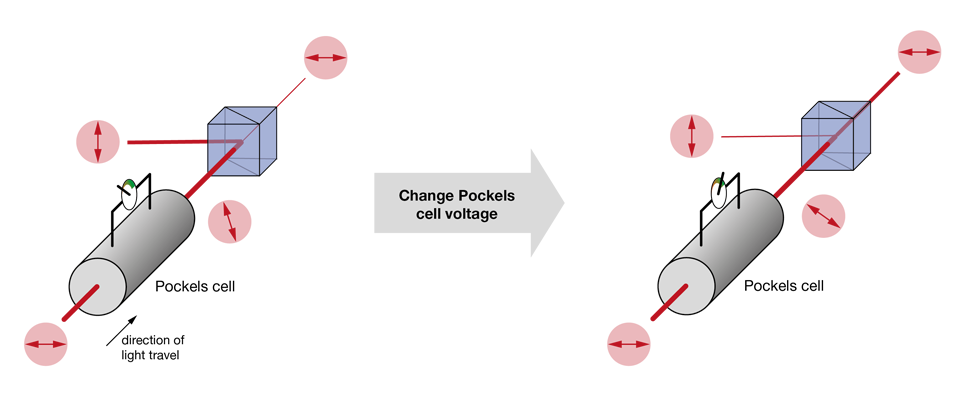
The most used approaches today rely on changing the polarization plane of the input laser light and then filtering out one of the polarization components (the “rejected light”), while keeping the other (the “imaging beam”). In nearly all cases, this filtering is achieved by a polarizing beam splitter. What varies between the different methods is the way the polarization angle is changed. A very simple approach is to use a half-wave plate (rotated either manually or using a stepper motor) to adjust the polarization angle of the laser light. This solution is cost-effective, but slow. Faster is the use of a Pockels cell – these elements rotate the polarization plane depending on the voltage applied to a crystal (the Pockels effect). Often Pockels cells will be sold with a polarizing beam splitter (or other means of filtering the polarization) already included, hiding the detailed function under the hood.
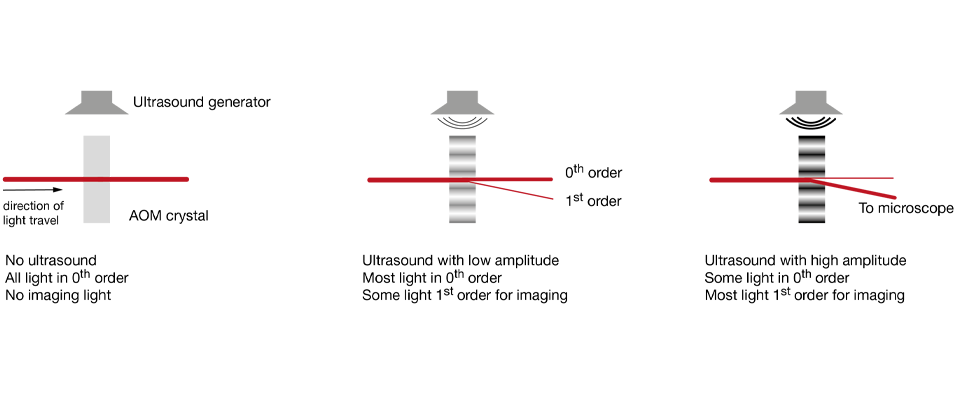
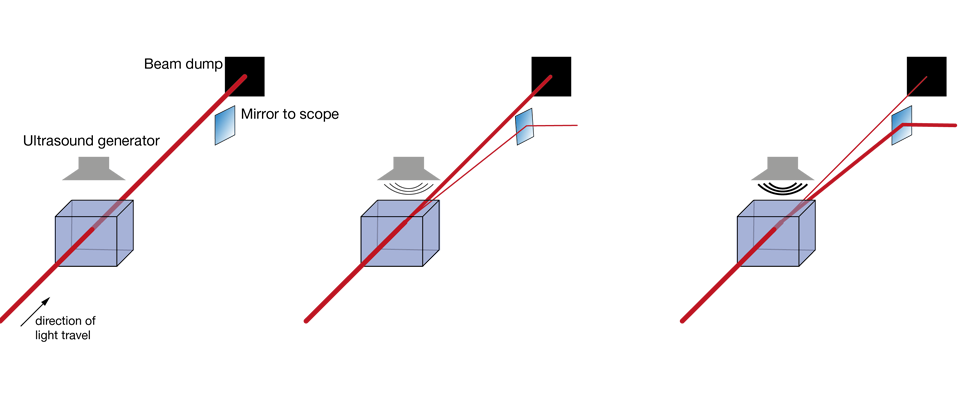
Increasingly popular is the use of diffractive elements to attenuate laser power, most commonly in the form of acousto-optical modulators (AOMs). Simplified, these can be thought of as variable gratings in which a sound wave modulates the spacing. The grating diffracts light, generating a pattern of beams (known as “orders of diffraction”), and by changing the amplitude of this grating one can shift the distribution of power between these orders of diffraction. In AOMs configured to control laser power, most of the power is contained in two of these orders, the zeroth and the first. Generally, the first order is the beam used for imaging, while the zeroth order is rejected. AOMs are increasingly found integrated into fixed-wavelength lasers (where they simplify the optical set up by reducing the number of separate elements on the optical table), with the first stand-alone units for two-photon microscopy recently becoming available. Take a look at our Beam Conditioning Unit.
Pulse compression
Two-photon excitation requires two photons to interact with a fluorescent molecule at the same time, the likelihood of which increases with greater numbers of photons at the sample. To sufficiently increase the number of photons (while using bio-compatible average power levels) we use lasers with ultrafast pulses (<1 ps) in place of continuously emitting lasers. In contrast to continuously emitting lasers, these pulses do not consist of single wavelength and instead are composed of a near-Gaussian spectral spread around a central wavelength. The result is that a range of wavelengths are present in ultrafast laser pulses (the spectral bandwidth of the pulse), even when tuned to a specific wavelength. The product of pulse width and spectral bandwidth is constant (the time-bandwidth product), so the shorter the pulse, the wider this spectral spread. For example, a 70 fs pulse at a central wavelength of 920 nm has a full width at half maximum of at least 13 nm, while a 140 fs pulse at 920 nm has just half of that width.
In itself, this spectral width is not an issue for multiphoton microscopy, however the speed with which light travels through a medium such as glass is wavelength-dependent: the longer the wavelength, the faster it travels. As a result, an ultrafast pulse gets pulled apart in time as it travels through glass and the resulting stretched pulse is less efficient at exciting fluorescence. The stretched pulses are often referred to as being “chirped” because the wavelengths are spread over time. The underlying effect is called group velocity dispersion (GVD, unit: fs2/mm), with the integral of the GVD caused by a given optical component being referred to as the group delay dispersion (GDD, unit: fs2). In air, this effect is negligible, but in glass it quickly becomes a serious problem, especially when working with pulses shorter than 200 fs (i.e. all lasers typically used for multiphoton imaging). To highlight the severity: a 70 fs pulse passing through a full optical system of a modern multiphoton microscope (including all the elements described in this article) can be stretched to over 700 fs, leading to a 90% loss of excitation efficiency (the relationship between pulse-width and excitation efficiency and resulting fluorescence will be covered in a future post).
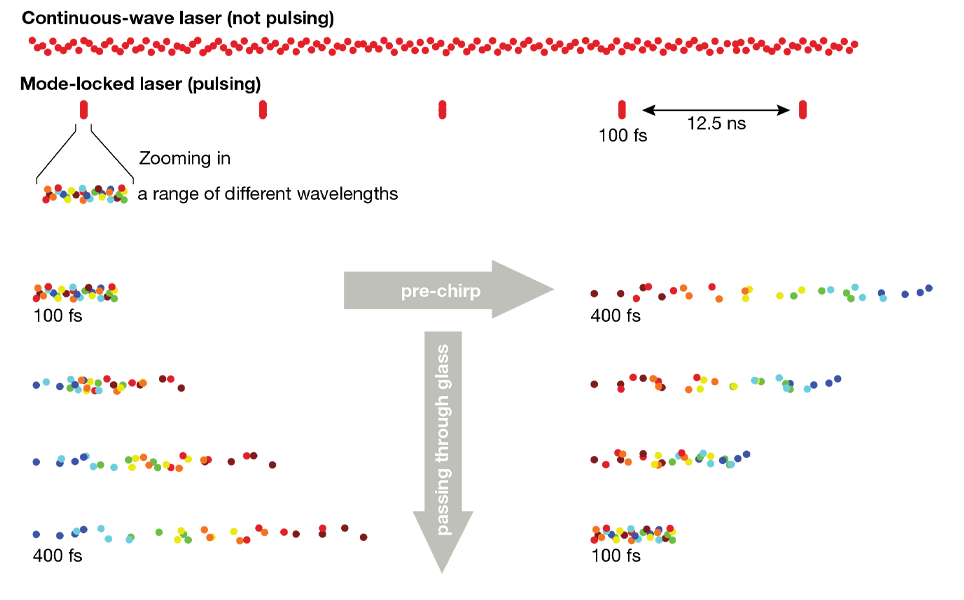
Avoiding this loss in excitation efficiency can be achieved by GDD pre-compensation, often referred to as “pre-chirping”. The basic idea is simple: if longer wavelength light travels faster in glass (thereby stretching the laser pulse), why not create a situation where the pulse is stretched the other way (with longer wavelength photons delayed)? Then, as this pulse which has been stretched in the opposite direction (“negatively chirped”) passes through the glass components of the microscope, the longer wavelength photons start catching up, continuously shortening the pulse. If the negative chirp applied at the beginning is as large as the positive chirp that the microscope system introduces, then the pulse width at the sample will match the pulse width out of the laser. This is exactly what the GDD pre-compensation of many lasers does.
Pre-chirping is achieved by splitting the constituent wavelengths of the laser pulse, and having the longer wavelength components travel a larger distance than the shorter wavelength components. The widest spread approach for this is to use a combination of prisms, however, in some cases, diffractive gratings are used instead. The concept is explained well in this technical note from APE GmbH, which also recaps the concepts touched on here.
It is important to remember that avoiding pulse broadening through dispersion is better than pre-compensating. For pulses over about 70 fs, the difference is not very pronounced, but the shorter the initial pulse gets, the more difficult efficient pre-compensation is.
Intermezzo
Let’s take a step back and look at where we are: we have covered the laser, as well as how the laser beam gets to where it needs to be. After that, we touched on how a laser beam is attenuated and brought to the right diameter, and finally discussed the need for pre-chirping of ultrafast lasers to achieve the brightest images.
All of this is needed in a multiphoton microscope, but it is also found in ultrafast spectroscopy setups and many other application fields. The next step is where it gets more specific: the laser beam is introduced into the microscope. The actual coupling is achieved with elements we have already discussed: commonly a pair of mirrors form a periscope, bringing the laser beam from the table level to the input port of the scan head.
How does a single laser beam form an image? In multiphoton microscopy, as in laser-scanning microscopy in general, the (ideally diffraction-limited) laser focus is moved across the sample being imaged. At each point the resulting fluorescence intensity is measured and assigned to the pixel that is being illuminated. We will look at those steps in more detail in Part 2 of this introduction.
Something needs to create the excitation light: the laser
Until about 2010 there was little choice when it came to lasers for two-photon imaging – it was always going to be some flavour of titanium-sapphire laser. These lasers produce pulses, commonly with pulse-widths between 70 and 140 fs (i.e. “ultrafast” or “ultrashort” pulses), at a repetition frequency of 80 MHz, and are generally tunable in the range of 690 to 1050 nm. As a result, they work well for most two-photon imaging experiments. But if a user wanted to use fluorophores that are excited at longer wavelengths (e.g. some cyanine dyes), they needed complicated and expensive extensions (e.g. optical parametric oscillators, OPOs). And if a researcher only needed a single wavelength for their experiments, and had no use for tunability, they still needed to pay for that tunability
In a first major change to the field, ultrafast laser sources that are tunable over an extended range from 690 – 1300 nm were introduced in 2011. With pulse widths, power levels, and repetition rates matched to those of Ti:Sa lasers, these laser sources quickly found wide-spread use. Though often sold as part of the “Ti:Sa range”, these light sources are very different beasts, best referred to as “one-box OPOs”. The OPO in these devices is pumped by a micron wavelength fibre laser and as a result they often use that pump laser as a second output at around 1040nm.
For the many researchers only ever needing to excite a single fluorophore (most commonly eGFP or GCaMP), recent advances in fibre lasers have seen a near flood of two-photon suitable fixed wavelength lasers being introduced into the market. Initially, this was limited to the 1020 – 1064 nm (“micron wavelength”) range, but fibre lasers in the 920 nm wavelength band required for eGFP imaging has also been available since 2018. These fixed-wavelength lasers all have pulse-widths and repetition rates similar to Ti:Sa lasers, but power levels can vary (1 micron wavelength lasers tend to be more powerful, 920 nm lasers tend to pack a bit less of a punch). In addition to a lower purchase price, these lasers tend to have much lower service requirements, are quieter and generate less heat in the room than the larger, tunable options.
How pulse-width, repetition rates and power levels interact, and their impact on multiphoton excitation will be addressed in future articles.
Guiding the light to where it needs to go: mirrors
Looking at a two-photon imaging system, the mirrors on the table are likely to be seen as the least interesting or exciting component. But it is worth keeping in mind that the laser beam is reflected by several mirrors (easily over a dozen in more complicated setups) before it reaches the sample, leaving a lot of chances for them to interfere with good imaging. If mirrors were perfect, they wouldn’t impact the result; however, in reality mirrors are far from perfect. One could say that good mirrors won’t make an experiment better, but they will make it less bad.
The case for using more mirrors is easy: for easy and reliable alignment two mirrors are required in front of each element on the table that needs a beam to be centred and parallel (see: alignment article for a detailed explanation). At the same time, the commonly used protected silver mirrors lose 2 - 3% of light in the multiphoton wavelength range per reflection. These losses are multiplicative, so the total loss is: 100 * (1 – (1 – 0.02)number of mirrors)%, meaning a system with 10 mirrors in the path between the laser and the sample will lose 20 to 25% of light just on the mirrors – if they are performing to specification and not glazed over or dirty. Consequently, ensuring the best quality mirrors are used and that they are kept clean is vital (Tips for cleaning the optics of your microscope). It is also worth ensuring that only the number of mirrors that are needed for safe, stable and reliable performance are used.
It is tempting to use mirrors with dielectric rather than metallic coatings, as these can achieve a reflectance of over 99.5%. The downside here is that simple dielectric coatings have a narrow wavelength band in which they are this reflective (usually <100 nm wide), dropping to very poor performance outside of that band. Wide-band dielectric mirrors are either not suited for the ultrafast pulses used for multiphoton imaging (they can degrade the pulse shape and massively broaden the pulse, see this blog post by Labrigger), or if they are designed for use with ultrafast laser pulses, they are much more expensive (roughly 10-fold the price).
In general, the ideal coatings for flexible multiphoton imaging are protected silver coatings. But for some special use cases, dielectric mirrors make sense (e.g. when fixed wavelength lasers are used and a narrow reflection bandwidth is not a concern).
Tweaking and adjusting the laser output: beam conditioning
Now that the laser is pointing in the right direction, it is time to think about how the laser beam needs to be adjusted and optimized for use in microscopy. The key points that need to be adjusted are:
- Beam diameter (to ensure good filling of the objective back aperture)
- Laser power (to achieve best possible imaging without causing damage)
- Pulse duration (to ensure the most efficient multiphoton excitation)
Beam diameter
Beam diameter adjustment is typically achieved with a telescope consisting of two lenses. Passing through this beam expander, the input beam diameter is increased (flipping input and output will lead to a decreased size). Most beam expanders will require the collimation of the expanded laser beam to be tweaked. Ensuring the collimation is optimal is important to ensure reliable and predictable performance.
Laser power
Laser power is commonly adjusted via one of three methods:
- Varying neutral density filters
- Laser light polarization
- Diffractive elements
While in the past, attenuating the beam using neutral density filters was common, it has now fallen out of practice. Neutral density filters tend to be slow, inflexible and can introduce a heat-dependent lensing effect.
The most used approaches today rely on changing the polarization plane of the input laser light and then filtering out one of the polarization components (the “rejected light”), while keeping the other (the “imaging beam”). In nearly all cases, this filtering is achieved by a polarizing beam splitter. What varies between the different methods is the way the polarization angle is changed. A very simple approach is to use a half-wave plate (rotated either manually or using a stepper motor) to adjust the polarization angle of the laser light. This solution is cost-effective, but slow. Faster is the use of a Pockels cell – these elements rotate the polarization plane depending on the voltage applied to a crystal (the Pockels effect). Often Pockels cells will be sold with a polarizing beam splitter (or other means of filtering the polarization) already included, hiding the detailed function under the hood.


Increasingly popular is the use of diffractive elements to attenuate laser power, most commonly in the form of acousto-optical modulators (AOMs). Simplified, these can be thought of as variable gratings in which a sound wave modulates the spacing. The grating diffracts light, generating a pattern of beams (known as “orders of diffraction”), and by changing the amplitude of this grating one can shift the distribution of power between these orders of diffraction. In AOMs configured to control laser power, most of the power is contained in two of these orders, the zeroth and the first. Generally, the first order is the beam used for imaging, while the zeroth order is rejected. AOMs are increasingly found integrated into fixed-wavelength lasers (where they simplify the optical set up by reducing the number of separate elements on the optical table), with the first stand-alone units for two-photon microscopy recently becoming available. Take a look at our Beam Conditioning Unit.


Pulse compression
Two-photon excitation requires two photons to interact with a fluorescent molecule at the same time, the likelihood of which increases with greater numbers of photons at the sample. To sufficiently increase the number of photons (while using bio-compatible average power levels) we use lasers with ultrafast pulses (<1 ps) in place of continuously emitting lasers. In contrast to continuously emitting lasers, these pulses do not consist of single wavelength and instead are composed of a near-Gaussian spectral spread around a central wavelength. The result is that a range of wavelengths are present in ultrafast laser pulses (the spectral bandwidth of the pulse), even when tuned to a specific wavelength. The product of pulse width and spectral bandwidth is constant (the time-bandwidth product), so the shorter the pulse, the wider this spectral spread. For example, a 70 fs pulse at a central wavelength of 920 nm has a full width at half maximum of at least 13 nm, while a 140 fs pulse at 920 nm has just half of that width.
In itself, this spectral width is not an issue for multiphoton microscopy, however the speed with which light travels through a medium such as glass is wavelength-dependent: the longer the wavelength, the faster it travels. As a result, an ultrafast pulse gets pulled apart in time as it travels through glass and the resulting stretched pulse is less efficient at exciting fluorescence. The stretched pulses are often referred to as being “chirped” because the wavelengths are spread over time. The underlying effect is called group velocity dispersion (GVD, unit: fs2/mm), with the integral of the GVD caused by a given optical component being referred to as the group delay dispersion (GDD, unit: fs2). In air, this effect is negligible, but in glass it quickly becomes a serious problem, especially when working with pulses shorter than 200 fs (i.e. all lasers typically used for multiphoton imaging). To highlight the severity: a 70 fs pulse passing through a full optical system of a modern multiphoton microscope (including all the elements described in this article) can be stretched to over 700 fs, leading to a 90% loss of excitation efficiency (the relationship between pulse-width and excitation efficiency and resulting fluorescence will be covered in a future post).

Avoiding this loss in excitation efficiency can be achieved by GDD pre-compensation, often referred to as “pre-chirping”. The basic idea is simple: if longer wavelength light travels faster in glass (thereby stretching the laser pulse), why not create a situation where the pulse is stretched the other way (with longer wavelength photons delayed)? Then, as this pulse which has been stretched in the opposite direction (“negatively chirped”) passes through the glass components of the microscope, the longer wavelength photons start catching up, continuously shortening the pulse. If the negative chirp applied at the beginning is as large as the positive chirp that the microscope system introduces, then the pulse width at the sample will match the pulse width out of the laser. This is exactly what the GDD pre-compensation of many lasers does.
Pre-chirping is achieved by splitting the constituent wavelengths of the laser pulse, and having the longer wavelength components travel a larger distance than the shorter wavelength components. The widest spread approach for this is to use a combination of prisms, however, in some cases, diffractive gratings are used instead. The concept is explained well in this technical note from APE GmbH, which also recaps the concepts touched on here.
It is important to remember that avoiding pulse broadening through dispersion is better than pre-compensating. For pulses over about 70 fs, the difference is not very pronounced, but the shorter the initial pulse gets, the more difficult efficient pre-compensation is.
Intermezzo
Let’s take a step back and look at where we are: we have covered the laser, as well as how the laser beam gets to where it needs to be. After that, we touched on how a laser beam is attenuated and brought to the right diameter, and finally discussed the need for pre-chirping of ultrafast lasers to achieve the brightest images.
All of this is needed in a multiphoton microscope, but it is also found in ultrafast spectroscopy setups and many other application fields. The next step is where it gets more specific: the laser beam is introduced into the microscope. The actual coupling is achieved with elements we have already discussed: commonly a pair of mirrors form a periscope, bringing the laser beam from the table level to the input port of the scan head.
How does a single laser beam form an image? In multiphoton microscopy, as in laser-scanning microscopy in general, the (ideally diffraction-limited) laser focus is moved across the sample being imaged. At each point the resulting fluorescence intensity is measured and assigned to the pixel that is being illuminated. We will look at those steps in more detail in Part 2 of this introduction.
Want to learn more?
Sign up to our news bulletin to receive the latest advice guides, news and product updates. All content is focused around giving you the tools to achieve ground-breaking findings.


)